Tec-Alert Newsletter
Guide to Wire Wrapping

In 1952, a new technology was discovered by The Bell Laboratory, Western Electric Company to form a consistent gas-tight electrical connection by tightly wrapping wire around a terminal with two sharp edges. This advanced technology would open the door to meet the needs of more complex electronic equipment, allowing for more terminals in less space. Since then, the electronic, telecommunication and aviation industries have recognized wire wrapping as the most reliable, stable and common method of connecting signal and power terminals in today’s advanced work force.
Wire Wrap Guide:
How to Make Wire Wrapped Connections
Helpful Wire Wrapping Tips
Common Wire Wrapping Problems
How to Make Wire Wrapped Connections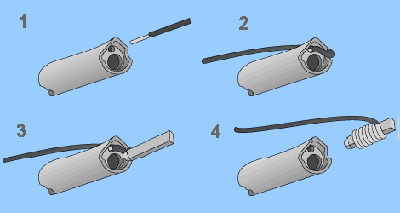
Step 1: Insert the pre-stripped wire into the wire slot of the wrapping bit.
Step 2: Anchor the wire in the notch of the wrapping sleeve.
Step 3: Insert the terminal into the center hole of the wrapping bit.
Step 4: Activate the wire wrapping tool. This rotates the wrapping bit and wraps the wire around the terminal.
Helpful Wire Wrapping Tips
• Coiling the wires around the sharp corners of a .025 in. square receptacle post creates a wire wrapped termination.
• A clean metal-to-metal contact between the wire and the post can be achieved by bending the wire around the sharp corner, breaking the oxide layer of both surfaces, thus revealing an oxide-free surface.
• Try to avoid kinks in the wire when stripping.
• Don’t use wire that will break easily.
• The minimum number of turns is based on wire gauge and the type of wrap.
• Standard Wrap = Coils bare wire only around the post
• Modified Wrap = Coils the wire and a portion of insulation increasing the ability to withstand vibration.
• When using wire wrap guns, make sure to not hold too tightly against the board to prevent bunched up, messy coils around the base of the post.
• Holding a wrap gun with too little pressure can result in spaces between the coils on the post, making the post visible.
• Pulling the trigger of the wrap gun too hard will result in broken wire inside the gun barrel.
• “Backforce” features on electric wrap guns are important to prevent against overwrapping from excessive force.
• Proper Daisy Chain – wiring several points together can be easy if done correctly. Figure A and B show the proper and improper way to daisy chain. If a mistake was made, the entire wire would have to be unwrapped in Figure A. In contrast, Figure B you would have at the most three wires to unwrap to remove any wire in the chain. This is the preferred approach.
Common Wire Wrapping Problems: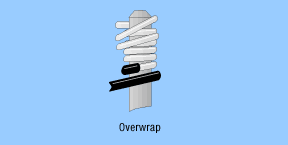
• The Overwrap - Don’t press too hard! Wires will slip over the preceding turn if you push down too hard on the wrap tool while turning. Make sure to practice to ensure a quality connection.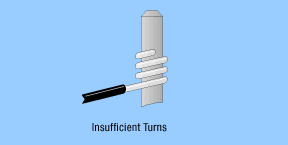
• Insufficent Turns – Push wire all the way into wire slot. Improperly feeding of wire into the wire slot of the bit results in insufficient turns of wire for regular wraps or insufficient insulation turns for modified wraps.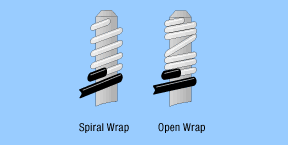
• Spiral Wrap/ Open Wrap – Don’t remove the tool too quickly! Wire turns more than 0.005 inches apart, called spiral or open wraps, are caused by too rapid a removal of the wrapping tool.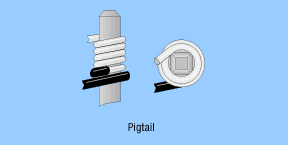
• Pigtails – Select the proper bit and sleeve. When a wire has not been completely wrapped the result is a “pigtail”. This results if the size of the bit is improperly matched to the terminal diagonal.
Return to Top of Page
BUILD YOUR OWN TOOL KIT
Subscribe to our Tec-Alert Email Newsletter
Get tips & information for field service and MRO professionals.
